via youtube.com
Via flutterby.
Posted via web from crasch’s posterous
Live forever or die trying
Via flutterby.
Posted via web from crasch’s posterous

“Your kid is a special human being to you and therefore you should ensure that your kids bedroom designs are also that much special. We all adore our kids and love them very much and it is exactly for the same reason that to make them feel special we should always go for the best things; especially their bedroom because it is their own space. Designing a kids bedroom can be an ultimately fun and enjoyable process. The hardest part of the decision making is to choose what type of theme to opt for, with choices such as boating, castles, football, fairytale and history the choices are literally endless. But have you ever tought at a Jurassic Park themed bedroom ? The bottom jaw of the dinosaur is hinged to reveal a built in toy box, and the murals in the bedroom reflect the dinosaur theme.”
Posted via web from crasch’s posterous

“How do you live in a small apartment, and still have the opportunity of having a bed, a nice big couch, and even the possibility of having friends over. I solved the problem with two normal mattresses . I put legs on the mattresses with hooks to keep it all together during the night. We have the bedlinen in a basket next to the couch/bed. The top mattresses are the thin type, and I have made covers for them, so it is easy to make the bed in the evening.”
Posted via web from crasch’s posterous
A friend of ours told recently us about the furniture that the folks at the graphic design studio, Oat, made for their studio in Somerville. We loved the idea, and when we went to check it out we had a great time visiting and hearing how they made it. Rory, Oat’s founder, took plumbing pipes and joined them, making creative desks and a simple coffee table that wouldn’t be too hard to customize yourself. More details and photos after the jump
deskwider2.jpg
Rory connected inexpensive black pipes from Home Depot in an simply designed desk and coffee table. We loved the thin-diameter pipes he used which made the pieces look elegant, and their well thought-out design. The desktops are reclaimed walnut which add to their rough industrial look. He and Jen, Oat’s co-founder and creative director, had the pipes cut to length and then screwed them together themselves. This would be a great look for desk in a home office, or a coffee table customized to a odd-sized space.
Posted via web from crasch’s posterous

Beautiful stairs. Via flutterby.
Posted via web from crasch’s posterous
Stainless steel counter tops are, to say the least, popular, desirable, and considered very high end. Here is a detail I developed for my son’s upcoming house renovation, which includes a new kitchen in a whole new location from where it is now. This detail is a way to have real stainless steel counters at far, far less cost than to have complete counters, with integral sinks and back splash, and a full edge.Essentially, these are sheets of stainless laid over a plywood base and trimmed with tile. The cost of custom stainless steel counters is very much for labor. The raw material (while up 35% in the last 6 months) is still fairly reasonable, albeit more than some other surfaces. 14 gauge, which I suggest for this project, is about $15 per square foot. Add a bit for them to cut it to size. Also, anything longer than 12 feet is custom. You can save a buck or two by going to thinner 16 gauge, but I think that’s too thin for this application, and may dent if something heavy gets dropped on it. While any metal can dent, 14 is sufficiently strong to resist most kitchen accidents. Instead of formed sinks and edges, use a drop in stainless steel sink and tile for the edge and back splash.
One thing to keep in mind is any “L” or “U” shaped counters. For that, you’re likely to need welded mitres. That gets costly, so this method is best for straight runs of counter only. It can also work on an island, which may give you the look by having just a spot of it mixed with your other counter material. Alternatively, you could just live with the exposed seams, but I think you’ll be unhappy with this. The seams are hard to seal and they could lift. They’ll also be very obvious.
So …. you just need to order the metal, precut to the size you’ll need. Don’t forget that your counters are **more** than 24″ deep. They’re probably a minimum of 25″, and could be as much as 26″ or even 27″. Be sure to allow for any needed overhang and measure carefully. Once it is cut, you own the metal. I suggest you cut your plywood a tiny bit long (1/8″ to a max of 1/4″) and then sand it using a belt sander so it is flush with the metal when it is installed.
The method is simple. Put one layer of 3/4″ plywood on top of your base cabinets and secure it with screws from below, through the cabinet webs that are there for that purpose. Now put the second layer over that and screw it down from the top, into the first layer. Make any cutouts needed (for sinks, for example). Spread an adhesive made for both wood and metal. (Liquid Nails brand has one, but it is NOT the usual Liquid Nails product.) If you can’t readily find the right stuff, ask. Make sure it is a type you can spread with a notched trowel. You want an adhesive that dries solid but retains some flexibility. You may have to go to a specialty supplier. (Almost all stainless steel counters in homes are glued to plywood, so surely it is available in your area.) Whatever you use, do NOT get contact cement. You need to be able to adjust the metal after you lay it down.
Spread the adhesive with a notched trowel. Use the smallest notch recommended for the adhesive. If none is specifically recommended, use a small one so you’ll lay only a thin coat. Maybe a 3/16″ notch. When everything is evenly coated with the adhesive, its time …….
Lay the sheet of stainless on the adhesive. Push the metal so it butts against the wall. If there are gaps, don’t worry; the tile will cover it later. Critical is to get the tile lined up with the front edge of the counter. When it is where you want it, it needs to be pressed firmly to make good contact with the adhesive. Use an industrial roller. Lacking that, a wooden rolling pin will also do the trick. A small roller may be needed to get into the wall.
Now let it dry per the adhesive manufacturer’s directions.
Now the hardest part ….. you have to make the cutout for the sink to match the cutout in the plywood you already made. I say its hard, but really, it isn’t. Allow the adhesive to dry fully. Use an electric jigsaw with a metal cutting blade. Be sure to put some tape or even glue some felt to the shoe so the saw doesn’t scratch the metal. Maybe even better is to put a bunch of that blue painters tape on the counter along the cut line. Lay several widths so you cover any area that could possibly come in contact with the saw. The saw’s base (shoe) **will** scratch the counter. You could use the tape to mark the cut line, too. File or grind the cut edge to remove any burrs or sharp areas.
You could also use an angle grinder with a metal cutting wheel to make these cuts. just be careful. The grinder could build up enough heat to discolor or warp the metal. While this isn’t very likely if you use care, it could.
Now you’re in the home stretch. All that’s left is to install the sink and tile the edge and back splash. The sink is done like any other sink installation – no special tricks. Just make sure the seam between the sink and the counter top is well caulked. The best seal is plumber’s putty. Use it generously and wipe any excess off later. It doesn’t harden and it doesn’t stick like glue, so cleanup is easy. The worst that happens is some linseed oil residue. Clean that with 409 or even with lighter fluid.
Before you install the tile, caulk all the wall/counter joints. I suggest you use silicone sealant. Put some blue painter’s tape on the wall about 1″ above the counter. Put another line of tape on the counter top, just slightly less than the thickness of the tile you’ll be using. Now lay a generous bead of the sealant. Make sure it gets down into any gaps and fills them. When you get the bead laid, work it with your finger to give a nice radius between the wall and counter top, feathering it to near nothing by the time you get to the tape. Remove the tape as soon as you’re done. Don’t worry about the fact that you now seem to have taken some of the area that the tile will need to fit tight. You need to keep the tile off the counter by about a penny’s thickness – or maybe even more, depending on your tile. In essence, keep the tile one full grout line width above the counter.
Let the sealant dry. This might take overnight.
When you tile, be sure to protect the counter top. I suggest painter’s tape and rosin paper. Lay a line of tape right up to the edge of the front, ends and back of the counter. Now cut rosin paper to fit and tape it down. If you tape a line first, you don’t need to be very fussy with the location of the paper; just cover what’s exposed after that first line of tape was laid. Keep this in place until all the tile work, including the grout, is done. The mortar and grout are very abrasive and will ruin the counter.
A few words about the counter edges. I show three ways to form the plywood edge. In the first case, you simply lay one piece over the other and move on. Easy. But the downside is that the raw wood edge is prone to water absorption and could cause the tile not to stick, or later, if the gout fails, allows the counter substrate to get wet and maybe delaminate the metal.
The second way shows the edge mitred with a turn down of plywood. This forms a solid base for the tile and hides all the end grain of the plywood. But it can be fussy to fabricate.
The third way may be the best. Cut a rabbet on the edge of the top piece, leaving only the top ply of wood intact. Join the front piece with glue and nails or screws. This covers almost all the end grain and is easier to fabricate than the second method.
In the second or third case, use a silicone based glue – or even silicone sealant – as the glue. This will hold things together and also waterproof the edge.
For the edge tile, consider using white (or silver) silicone sealant instead of grout for the grout line between the edge tile and the metal. This can be messy, so tape the tile and the metal first. Run the caulk, tool it with your fingers, and remove the tape immediately. This is the most vulnerable part of the whole installation. You may find that this joint needs to be resealed (or regrouted) once in a while. If this happens, remove as much of the old material as possible before you redo it. The rest of the counter, edge, and tile should last as long as you do.
Not shown in the illustration is another whole way to do the edge. Use wood! Just make sure to bed it in a generous amount of silicone so as to fully and completely waterproof the joint. Use polyurethane as a top coat, even if you’re using prefinished moldings.
If you have any questions, you can certainly PM me. But maybe ask them in this post so others can see it too.
Some notes about stainless:
1. It isn’t. It could show some stains from odd things. We have a ring from a coffee cup next to our espresso maker. Faint, to be sure, but there nonetheless. I have NO idea what caused it. Surely not MY coffee!
2. It scratches. No matter how pristine it looks and no matter how careful you are, scratches will appear. At first it looks horrible.. After a month or three, it becomes a patina. And that’s what you want. Just look at any stainless working surface in a restaurant; you’ll see what I mean.
3. Fingerprints are a problem when the metal has no patina (uncoated appliance fronts). It won’t be a problem here.
4. This method of counter fabrication can handle hot pots with no problem. The glue forms a bit of insulation. The wood below can handle a good bit of heat so any that gets through won’t bother it. Remember, stainless is a poor conductor of heat.
5. Be careful with electricity. Stainless is conductive. While this should not be a problem with any normal, sound appliance, I’m just sayin’ ……..
6. Consider a deeper-than-normal sink. They make drop in stainless steel sinks that are 10″ deep. Try it. You’ll be glad for the extra depth. One word of caution, however: make sure your drain rough-in (where it comes out of the wall) is low enough to deal with the lower sink. The normal sink depth is 7″ or 7-1/2″. That extra 3″ of depth could put your drain connection below the wall’s connection point (he said from hard experience!). If you go for the deep sink, consider also a high arch faucet. Next time you try to fill that 12 qt pot to cook three pounds of macaroni you’ll thank me!
7. When you order your metal, you want type 304 or type 430 stainless in a number 4 mill finish. This is a semi matte that has a visible grain. This helps hide those first few scratches you’ll be cultivating. It is also a standard, non-premium finish.
Good luck! This is ambitious, but the results will be worth it.
Posted via web from crasch’s posterous

Scott Collins’ killer UrbanLounge chair is made from a single piece of bent plywood and looks to be stackable (though there’s no mention of the latter feature, if we had two of these, it’s the first thing we’d try to do). The UrbanLounge is the first in a series of forthcoming outdoor furniture from the Chicago-based designer, and while no renderings of those are yet available, you can see the rest of Collins’ work on Coroflot.
Posted via web from crasch’s posterous
Based in San Francisco, Link Studio has another take on the custom-manufactured kid’s furniture concept. This play table and bench can be ordered in any dimension to fit your kid–or to anticipate his growth rate. The bench can be a chair, the tabletop can be etched with any design or vector graphic you like–there are flowers on this one, but there’s one with a train track back in the studio. The set clocks in around $700, which is also not far off for this custom manufacture thing.
Posted via web from crasch’s posterous
Judson Beaumont makes some really cool stuff:
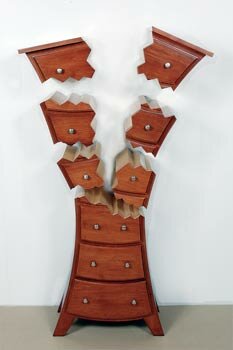
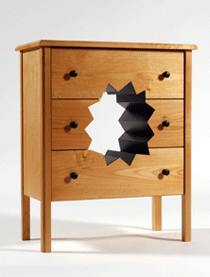


Via flutterby
Some really cool plywood furniture designs from Playatech. Via meredith
